Table of Contents
ToggleBlind baking a pie crust can sound rather intimidating to the uninitiated — particularly if you’re already feeling intimidated by the idea of baking a whole pie to begin with.
If this sounds like you, help is here! Blind baking is really nothing more than letting the pie crust bake for a little while on its own before you add the filling. It’s an easy process — especially once you know a few key steps.
What To Know About Blind Baking Pie Crust
To blind bake pie crust, prick the crust all over with the tines of a fork and line the unbaked pie crust with aluminum foil, or line the crust with parchment paper or aluminum foil then add pie weights.
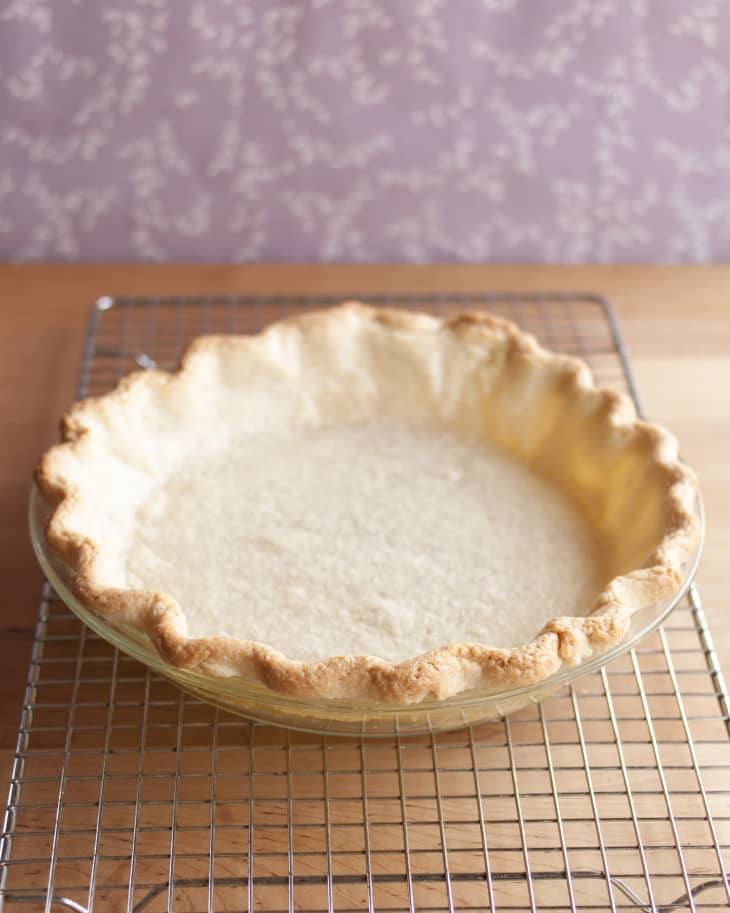
Bake the crust until the edges are golden, then remove the parchment paper, foil, or weights, and continue to bake the crust on its own until dry and flaky, but still pale for a partially cooked crust, or until a light golden brown for a fully cooked crust.

What Is Blind Baking?
All blind baking means is partially, or sometimes completely, baking a pie crust before you add a filling. You might wonder why we don’t just throw the crust in the oven as it is. The purpose of blind baking, aside from partially cooking the crust, is to prevent the pockets of steam in the dough from puffing up, which makes it easier to add the pie filling. The sides of the crust may also sag before they start to crisp, leaving you with a not-so-attractive slouching effect. The pie weights help to weigh down the crust and keep its shape.
When Do You Need To Blind Bake a Crust?
There are two times when blind baking is necessary: When we’re making a custard pie or when the pie filling is unbaked. With a custard pie, like a pumpkin pie, the moisture in the filling can make the crust soggy before it has time to actually bake. Blind baking the crust until it’s half-baked helps the crust stay firm. With an unbaked filling, like with a French silk pie, blind baking just makes sure the crust is fully baked before you add the filling.
But don’t worry — you shouldn’t have to guess very often. Your recipe will almost always tell you when blind baking is necessary. If you see a recipe that calls for a “cooked and cooled” pie crust, this is also another indicator that you’ll need to blind bake the crust before making the recipe.
Docking vs. Pie Weights
You might see some recipes that call for blind baking the crust by “docking” the pie instead of using pie weights. This simply means to prick the crust all over with the tines of a fork. These pinhole pricks allow steam to escape, preventing the crust from puffing up, and has the advantage of being a little quicker and less fussy than using pie weights. (If your filling is very liquidy, there’s also some risk that the filling will seep into the holes and make the crust soggy.)
Personally, I like using pie weights for the added support they give the sides as they’re baking.
Tips for Blind Baking Success
You can blind bake like a pro by keeping a few tips in mind.
- Line the unbaked pie crust with parchment paper or aluminum foil.
- Use pie weights, dried beans, or clean coins to weigh down the lined crust so the bottom doesn’t puff and the sides don’t slouch while it bakes.
- Once the crust is set — and you’ll know this because the edges will turn golden — remove the weights and let the crust cook a little longer on its own.
- Want a partially baked crust? Take a look at the bottom. You want it to look dry and flaky, but still pale. For a fully baked crust, cook until the bottom turns a light golden color. The whole process won’t take more than 15 or 20 minutes.
Pie Recipes That Use a Blind Baked Pie Crust
- Pumpkin Pie
- French Silk Pie
- Lemon Meringue Pie
- Coconut Cream Pie
- Banana Cream Pie
INGREDIENTS
- 1 single pie crust
EQUIPMENT
- 1 (9-inch) pie plate
- Parchment paper or aluminum foil
- Pie weights, dry beans, or pennies
- Baking sheet
INSTRUCTIONS
- Heat the oven and roll out the pie crust. Heat the oven to 425°F with a rack in the lower-middle position. Roll out the pie crust and transfer it to your pie plate as normal. Trim the edges and crimp.
- Line the pie. Cut off a large square of parchment paper or aluminum foil and use it to line the pie. Snug the lining right up against the edges and sides of the pie.
- Fill the pie with weights. Pour the pie weights into the pie dish. Make sure they cover the bottom of the pie and press against the sides of the pie. The weights on the bottom will keep the pie from puffing up and the weights against the sides will keep the sides from sagging as the crust bakes.
- Bake until the edges are barely golden. Place the pie on the baking sheet and bake until the edges of the crust are just starting to turn golden, 12 to 15 minutes. Remove the crust from the oven.
- Remove the pie weights. Grasp the corners of the parchment (or foil), and lift the weights out of the pie. Transfer them to a bowl or plate to cool. The bottom of the pie will still look wet and un-cooked at this point.
- Return the crust to the oven. Return the crust to the oven. Bake until the bottom looks dry, another 5 minutes. If the pie will not be cooked again with the filling, bake for another few minutes until the edges of the crust have browned and the bottom is lightly golden. The bottom crust will puff a bit as it bakes, but will deflate again when you remove the pie from the oven.
- Continue with the pie recipe. Check your recipe — some pies are assembled while the crust is still warm, others need the crust to be completely cooled.


